Wednesday, August 29, 2018
Tuesday, July 21, 2015
Please, Fence Me In

The lie? In reality, I hated my fence. Withered, weathered, and rotted out, my fence was falling down in so many places that I had to hold it up with wire and duct tape. The whole thing made me wince every time I left the house or came home, and I figured my neighbors were probably just as annoyed. I wouldn't let my little dogs outside because there were so many gaps they could escape through.
So this summer I finally made the decision to replace this abomination. After some research in a community social networking group, I found a wonderful, reliable fence guy, Gary Ambrose. He came to give me an estimate, and we chatted as he took measurements and sized up my yard. The more he talked, the more relaxed I felt. Then I realized a few things about the home construction project.

Get a specialist. Now let me say that Gary is strictly a fence guy, and he's been doing it for decades. He talked about fences the way I like to talk about Star Wars or Mexican food. And he made it interesting, too. Previously, a few handy-men had offered to replace my fence (such an eyesore, strangers passing on the street always made disparaging comments). But none of them were fence guys. I'm so glad I went with someone who specializes in fences and knows the ins and outs.

Think forward. My previous fence posts were rotted out, so instead of using wooden posts, I asked Gary to install steel posts. I want this fence to last for as long as I live in this house, and beyond that. I wasn't sure how it would look, but it's beautiful.

Be clear about what you want. Okay, I wasn't sure what I wanted until Gary gave me choices. Eventually, though, I came to make decisions on the type of wood, height, and style. Ultimately, I wanted something practical but attractive. We went with redwood with dog-eared tops. I am treating the wood with a clear sealant so it won't turn gray but keeps the wood color. It's more organic and has a beautiful redwood tone.
The project took only a few days. Demolition was pretty fast because, heck, most of the fence was falling over anyway. Without the old, rotting picket fence, my house felt exposed.

Poor, sad little yard. Needs a fence, no?
Then Gary and his crew came in and waved their magic wands. Okay, not really, but that's how it felt because anything like this is like magic to me.

They installed two gates within the fence.

Can you find the gate? No? It's hidden! Wow!
And it's BEAUTIFUL! The fence is high enough to give us a little privacy but low enough that we can check out what's going on in the world out there. The side fence by the driveway has a gate, but it is cleverly camouflaged into the rest of the fence. It's awesome. With a couple of park benches, we have a wonderful place to hang out in the yard. Everybody compliments me on the new fence--my next door neighbor even sent me congratulatory email!

It's our own personal park.

The dogs love it too.
So there we go. Now when I drive up to my house, I am no longer embarrassed by my sad little yard. Now I am proud of my gorgeous redwood fence.
If you live in the Los Angeles area and need some fence work done, I do recommend Gary Ambrose. He did a fine job, it's beautiful, and it has changed the whole look of my house. Thank you, Gary!
Sunday, May 10, 2015
Snaggletooth Gets an Undercoat
In an earlier post, I showed how I constructed little baby Snaggletooth the dragon. I shipped him off to Gint, a talented painter of miniature models. So far, Gint has put on Snaggle's base coat. What a big difference a coat makes!


I can hardly wait until the little guy is finished. Updates with the next round of paint! Thanks, Gint!
Sunday, February 1, 2015
Makin' a Dragon: Snaggletooth
I'm making a dragon. That's right. Making one. A dragon.
Last December a friend posted a video on Facebook of an artist creating a paper mache dragon. The artist is Dan Reeder, and his video went viral. I watched his videos over and over, bought one of his books, and even emailed him for help. (He responded! What a cool guy...).
You can make a dragon too! Check out Dan's website and blog so you can see the whole process in a lot more detail. While you're at it, buy one of his books. It's really important to support artists...
You can make a dragon too! Check out Dan's website and blog so you can see the whole process in a lot more detail. While you're at it, buy one of his books. It's really important to support artists...
Now I'm going to show you how my little dragon is progressing. Originally I made the parts for a large dragon, but I wanted to try out some of the methods on a smaller dragon. So here he is...Snaggletooth.

First I made the body parts. The parts shown in the pictures are actually for a much larger dragon, but I made smaller versions to make Snaggle. I crumpled newspaper and wrapped it with masking tape. Then I added strips of newspaper with a mix of flour and water. If you want the detailed instructions, check out Dan's website and Youtube channel. But do follow his two golden rules: (1) one sheet of newspaper at a time, and (2) flour/water mixture goes on your hands, not on the paper itself. If you have ever used the paper mache method, you will know how yucky the flour paste gets, and it destroys the integrity of the newspaper. This is all fixed if you put your hands in the paste instead of the newspaper. Trust me!


Next assemble the parts by adding the head and legs. I cut holes into the body section and attached everything with masking tape.


Then I added the arms and "fingers." To this, I draped pieces of bedsheets dipped in a bath of glue to form the wings. It took a while to get the wings to hang the way I wanted but well worth the time.


That's Dan Reeder's book on the chair behind Snaggle. I've gone through that book so much it's covered in glue and flour paste.

To the head I added horns and eyes. The eyes are matching marbles. Isn't he cute?


Then I added cheeks and an eyebrow ridge.

For the horns, I used Fimo clay, the glow-in-the-dark color. This color is perfect for an off-white look, also recommended by Dan. Just do everything he says and your dragon will look cool. He's been doing this for decades.


I added breastplates starting from the tip of the tail and working up to the neck.

For the legs and top of the tail, I added triangular scales. The scales transitioned to a different kind of scale at the head.


I removed the tongue for the entire process and added back for pictures. I'll leave it out for the painting stage and add it back when everything is finished.

A few more pictures, with and without the tongue. The natural lighting really shows off his wings.
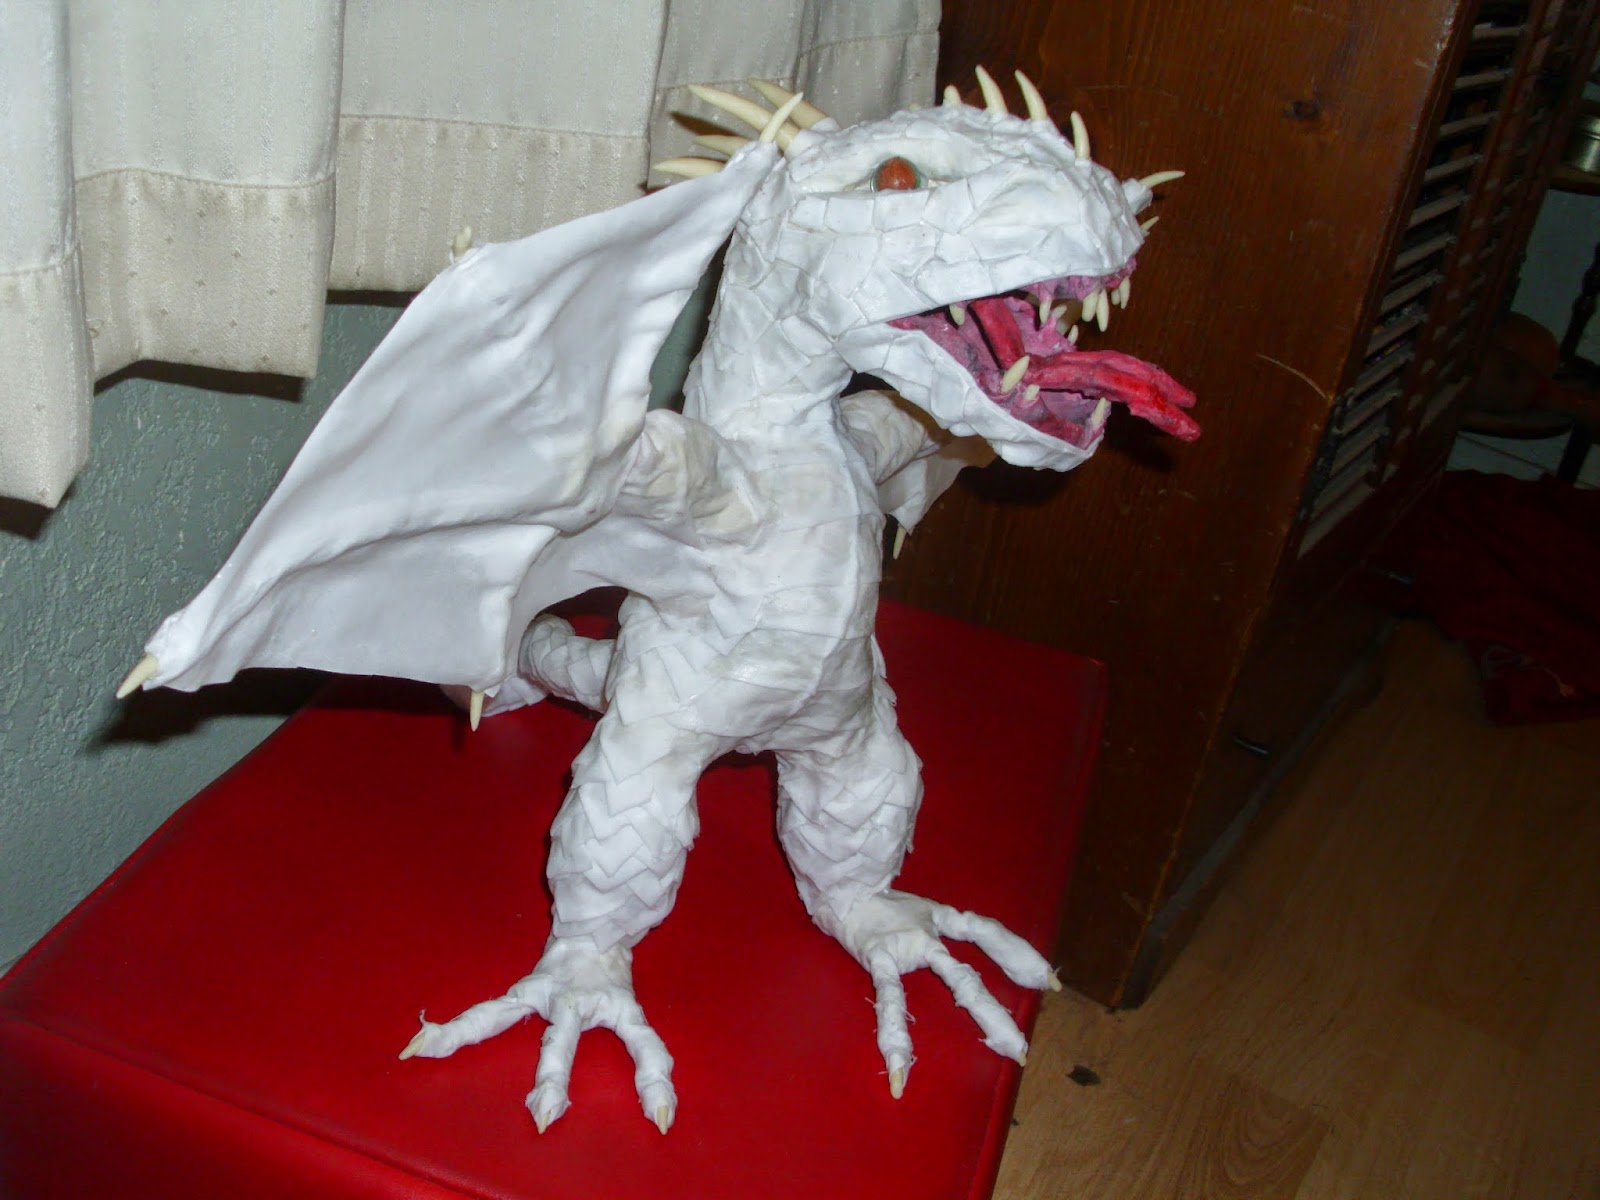

Now Snaggletooth is ready to paint!

And I can't say this enough. I am indebted to Dan Reeder, the gourmet paper mache guru and Monster Man, whose work inspired me. Thanks, Dan!
Post script: Here's an update on Snaggletooth's paint job. He's looking great so far!
Friday, November 8, 2013
The Book Thief: Clever or Contrived?

Book Review: The Book Thief by Markus Zusak
So many people said to me, you must read The Book Thief--it’s fantastic! But they never told me what it was about. I don’t know why I assumed it was supernatural fiction. Perhaps I was putting it into the same category as Inkheart, another book about books, where characters are viable living things. The Book Thief is nothing likeInkheart.I’m so sorry, everybody, but I don’t want to read 500+ pages telling me how horrible it was in Nazi Germany. I’ve actually been to Auschwitz. I’ve laid my hands on the ovens, toured the facilities where they experimented on Jews, and walked through the showers. Believe me, that pretty much does the trick for a long time. I had my World War II overdose and I’m a bit too much of an empath to go back for a while. I guess it's a personal thing.
Having said that, The Book Thief is a fine book to read if you want to understand some of the daily struggles of life in Germany at that time. This book peeks into the trials of pro-Nazi Germans, anti-Nazi Germans, neutral Germans just trying to survive, and, of course, Jews (most of whom are Germans; I assume they are anti-Nazi). The characters each have a clear voice and compelling stories to tell. You really care what happens to them, even if it takes 500 pages to get there.
Sorry I keep mentioning the number of pages, but it’s a very long book. I find it hard to believe this was written for a young adult audience. Just because the main character is a kid, does that make it a book for young adults? But I digress.
Aside from the characters, the other reason to read this book is the short story contained within it, “The Standover Man.” It is sweetly written and sweetly illustrated.
A comment about the writing style--first, at times Markus Zusak tries too hard to be literary. His style feels contrived. There is so much metaphor in the book that you get a little tired of it. Dude, just say it! Also I found the use of foreshadowing a bit excessive. Maybe the author feels he needs to do this because the audience is young adult (I’m not sure who came up with that classification), but when every other chapter ends with something like, “That was the last time she would smile--ever”--well, it gets real old. Actually, one chapter ends like this:
For now, though, let’s let him enjoy it.
We’ll give him seven months.
Then we come for him.
And oh, how we come.
Really? Do you have to end every chapter with a teaser like this? Also, I am annoyed by the excessive use of one-sentence paragraphs, but that’s just a pet peeve of mine.
I was so aware of the conspicuous use of literary devices that I had trouble getting lost in the story. Frankly, the writing seemed contrived and distracting. I would read a line like, “His fingers smelled of suitcase, metal, Mein Kampf, and survival,” or, "The sky was like soup, boiling and stirring," and then think to myself, oh he’s using figurative language again. Where was I? Oh right, I’m reading a book about a girl in Nazi Germany where Death is the narrator. See my problem?
In the Q and A with the author at the end of the book, Zusak himself comments on his use of figurative language: "I like the idea that every page in every book can have a gem on it." Don't be so deliberate! If figurative language is appropriate, go ahead and use it. But don't over-use it if it isn't necessary.
As I write this, I am not sure if people are even critical of this book, because they are so impressed by the theme of the badness of Nazi Germany, and that death is the narrator. Nevertheless I’ll take a chance. This book could have (should have) been about 100 pages shorter, or more. Remove the excessive metaphor usage, excessive foreshadowing, and sidebar comments by the narrator that don’t add to plot or character or setting. There! I feel better now. The book doesn’t seem so long and labored.
Saturday, September 28, 2013
tridecalogism
tridecalogism
"Tridecalogism" is a thirteen-letter word that means "thirteen-letter word."


Leo Lesquereux, paleobotanist
I just finished the first two books of the "Midnighter" series by Scott Westerfeld. A sci-fi fantasy story targeting young adults, the source of good magic is the number 13, and good guys in the story name their weapons with tridecalogisms.
To name a few:
• blamelessness
• backscratcher
• justification
• gravitational
• lexicographer
• irresponsible
• individuality
Our heroes are highschoolers (oh, that's a tridec!). Not to give too much of the story away, they use common household objects containing metal alloys as their weapons. They wield these weapons to kill dark, evil creatures like flying panthers. Reading about kids swinging a tire iron at a leathery vulture is one thing; when that tire iron is named "Unjustifiable Deliciousness," it brings the whole scene into three dimensions.
I loved this story for the plot, the characters, the mythology--it was a fun read. But even more than that, I loved learning all these tridecalogisms. I didn't even know there was a word for that! How scintillating! Now I instinctively count the letters in long words to see if there are 13. Twelve is just so...even, and uninteresting, and disappointing.
Overzealously yours, call me--
"Bubbleheaded Serendipitous Groundbreaker"

Samuel Clemens, lexicographer
**reposted from Portable Elephants
Sunday, August 4, 2013
Scarlet Begonias and Green Lantern: Rocking Out the Weeds
Recently I had the displeasure of refinancing my house. Besides airing my dirty financial laundry to the kind loan officer, I had to repaint parts of the house to cover peeling paint. That meant painting ALL of my fences. Even though I have a fairly small yard, the job took several days, especially painting every little slat of the picket fence in the front yard. I wondered if I could trick some unsuspecting kid into paying me to paint the fence himself, but no fitting candidates walked by.

After I finished painting the last slat on my front fence, I took a deep breath. The fence looked clean and white and beautiful. And the yard behind it? Blecch! Weedy grasses, clumpy dirt clods, I never pay attention to the darn thing unless I'm worried about getting fined by the city or the fire department. If you want to know what my yard looks like, watch the t.v. show "Malcolm in the Middle" and you'll get a pretty good idea.
Anyway, my cheery, freshly painted white picket fence now made my poor neglected yard look especially retched. I had to do something.
My yard is fairly tiny. My house occupies about a half-sized lot, and one of the main attractions for me was that I wouldn't have much yard to take care of. And yet--I still manage to make it look bad. I hate grass, and grass hates me. Walking to and from my house, I regularly shield my eyes so I won't have to see my weedy eyesore.

I wanted to fix the yard without having to take care of it. Putting in drought-tolerant plants seemed especially good--not because I care about the environment or anything like that, but because I don't want to have to remember to water my garden. I'm a plant killer. Except for weeds. Weeds love me. Anyway, I didn't want to be reminded every day that I have the same effect on plants as a Ringwraith.
Instead of putting in a lot of plants, then, I decided to create a rock garden -- sort of an art installation. I love huge art projects. I hate gardening. If I could make the garden into a huge art project, then I could stick with it and make it work. And then ignore it because there wasn't much I could really kill. A friend of mine called it a zen garden. Please, there is nothing zen about this. It's not about being in the moment, it's about avoiding weeds and dead plants in the future.
I dug up the yard into 4x4 foot squares, sectioning them off with plastic garden barriers.

I used flexible plastic landscape edging pieces to create designs within the squares.

With this design, I used weed blocker to deter the weeds. We'll see how that pans out. With later sections of the installation, I used newspaper, mulch, and plastic sheeting in different combinations.

For this swirl, I used three different kinds of landscaping rock--lava, white marble, and "canyon red."

Then I added drought-tolerant plants. Many of them are basic cactus succulents.

The ground cover is moss rose. It's supposed to be an annual, but I'm hoping it will stick around for a while.

In this section, I used newspaper and mulch to control the weeds.

We watered the newspaper to flatten it. I swear that's a hose.

On top of that, black mulch.

In this patchwork I used three kinds of rock. The center square will host a manzanita bush. I'll plant that in a couple of months, in the fall, when the weather is more permitting. Since manzanita is a native plant, I could really ignore it and it should flourish in spite of my Ringwraith abilities.

The next square has a river of rocks flanked by scarlet begonias. Yes, I'm talking about the Grateful Dead.

Adjacent to the "river" is a design that looks either like the Green Lantern or a Tie fighter.

I decided to go with Green Lantern. It was hard to find green landscaping rocks. I actually had to take a 30 mile drive to an industrial area just outside of L.A. It was worth it! The color of the rocks is "surf green." The photo doesn't do it justice--it really is very green. In the middle is a lavender bush.

By the way, I'm still working on the yard. Creating my space in 4 foot square sections means that I only have to do a little at a time. Here's how it looks so far. First the swirl and checker:

And the "river lantern":

Now, please don't say that I'm gardening, because I'm NOT! It's a huge art project, thank you very much. Getting rid of the weeds is just an added benefit. Rocks > Weeds.
***New addition: I added a sunburst. The circles have moss rose--no pics now but they are beautiful bloomers.


Subscribe to:
Comments (Atom)